Monday, July 16, 2012

A not so mellow yellow

Last summer when I went did a redo of the front of the house, I replaced the front door. I was then, of course stuck with the task of picking a paint color. I think I went through about ten colors. I put little swatches up and asked my friends to drive by and give their opinions. I went with a pale yellow which I decided was too light, so I went with a brighter yellow. Within a month I decided that was too right and ended up painting it a coffee with cream-ish color. So I ended up without the yellow door I wanted so badly, until now!


For the last 2 months the back door looked like this....


Yeah I know don't judge- I couldn't decide! We've had a lot of friends over during this time and always solicited their opinions, which were pretty much 50/50 overall.

 J was fond of the orange, while I was digging on the yellow. Well yesterday I decided to pull the trigger and go with the yellow. The color is Lowe's Valspar in Golden Promise.


This yellow was the second yellow I originally painted the front door but decided it was too school-bus-ish for the front of the house. But in the backyard there are lots of bright yellow accents like the umbrella..

the plant holders...


a few pots...


and even my pillows...


Yeah, yellow is my spirit color. Here is my door painting tool kit.


It's crazy bright and I'm in love. If you're in Richmond, or VA you know it's been hot as heckity outside. (Calling for 100+ temps today and through the weekend!) So you may be asking yourself, how did she paint an exterior door in these hot temps and not end up with a clumpy gross door? Well under recommendation and gift of a friend I added Floetrol to the paint. Floetrol is an additive that can be mixed to any paint that thins the paint out and therefore helps mask brush stokes.


Not pimentos, but a travel bit of Floetrol! I added about 2 tablespoons to my paint and mixed it up with my paintbrush. Having painting with this quart before, the difference was noticeable. The paint went on smooth and light, which helped limit brushstrokes in every which direction. Again, here's the final product.


Now only if I had someone to build that pergola and redo the deck for me...!


Oh, I can dream...

Wednesday, June 27, 2012

Cheap-o Bathroom Storage

I stumbled across this idea somewhere on the internet awhile ago and made a mental note- no bookmark- so thank you to whomever came up with this one. As I have mentioned over and over again, old houses have a serious lack of storage. This is especially true in the bathroom. Two years ago, we renovated the master bathroom and added a larger vanity with two shelves. However, there is still not enough room for everything. So I decided to add a shelf. I went to my local Lowe's and checked out the closet and shelving aisle. There are many options from pre-painted to rubber coated metal. Keeping in my mind that this would be going in the bathroom I was skeptical of purchasing he pre-painted MDF board. I immediately imagined the board cracking and falling apart. So I decided to check out the options in the lumber section. Here I found exactly what I was looking for for half the price! I chose a 1 inch by 12 inch by 4 ft. board which was about 5 bucks. The prepainted MDF boards in the closet section started at $10. Knowing that I had bright white semi-gloss paint left over from the stair project, I grabbed my board and brackets and headed on home.

Here are the items that I used...

Bought-
2 white brackets  for $1.47 each
1 board (1 by 12 by 4ft.) for $5


Had at home-
Drill
Valspar semi-gloss paint in Ultra White
6 screws
Paint brush

First, I needed to paint the board. I used my leftover stair riser paint.


I painted the board with three coats for a little extra moisture protection. I let it dry for about 24 hours to make sure it was good to go before hanging it. Then I got out my drill, brackets, and screws.


I decided that I wanted the shelf just slightly above the door frame.


A few screws and some rearranging, and here's what it looks like now.

 And my favorite view is looking through the mirror over the sink- you can see the shelf in the reflection. It seems so cozy now! And I love that I can have a plant in the bathroom now too. 


I'm thinking about installing another above the door shelf in the kitchen to display some of my Pyrex collection. My only qualm is that the metal brackets are not the most asthetically pleasing option. I think next time around I may pick a wood option or maybe spray paint the brackets a funky color. Also, I'm thinking that I'll dot some white paint on the tops of the exposed screws to help them blend in.

The total cost for this project was about eight bucks, it took no skill, and was not time consuming. In addition, I love that it makes an otherwise unusable/neglected space useful and pleasing to the eye.

Thursday, June 21, 2012

Junked out!

In lieu of two upcoming summer vacations, my goal is to tackle super cheap and/or free home projects. My first free project is to tackle the junk. Yes, I admit it. I have a ton of random items hiding in drawers, cabinets, behind furniture, etc. As I mentioned before, in a 107 year old house you must get creative with storage. 

Example number one- just a seemingly harmless dresser in the kitchen.

Until you open the drawers and BAM, tons of junk! A couple of the drawers are so filled that you can open them with out putting a little muscle on them. Ughhhh...


I started small with the top two drawers.


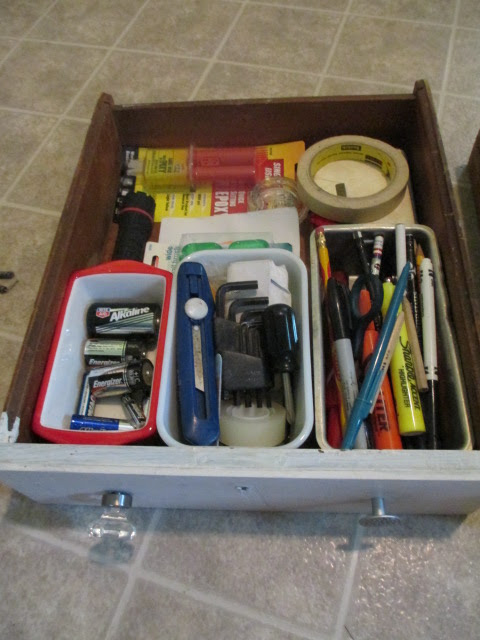
Once I got the drawers cleaned out, I discovered that what I really needed was some drawer organizers. Well, in keeping with the cheap/free theme I started looking around the kitchen. I thought that maybe a deep plate or bowl could serve the same purpose. And that's when I came across 3 small loaf pans. All three fit across the drawer perfectly! BINGO! One for batteries, random small tools, and lastly pens and pencils. Oh its lovely! And for those of you that are worrying- I can't remember the last time I used those pans, if ever. Two of them were part of Christmas presents from kids a few years ago and the third is a Pyrex I thrifited.

Next I worked my way down and through each drawer. I came across some interesting stuff...


(poker chips, one AWESOME cell phone, bump it hair accessory, endless random cards, chicken bowl, coasters from a bar, mustache, old fortune, screws/hangers...)

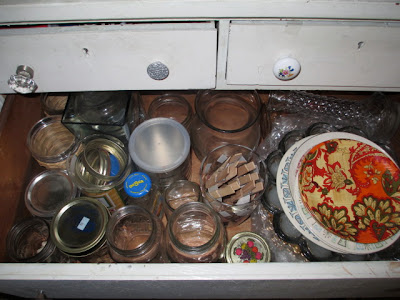
In reality, there was about 50% trash and about 50% random junk worth saving. After removing everything I started figuring out a new organization plan. The top drawer is now home to my observe jar collection, deviled egg platters, and random decorative plates.

The next drawer is now home to tablecloths, place mats, cloth napkins, aprons, and a few small trays. 


And lastly, the bottom draw is home to random decorative junk. Some decorative dishes, mugs, rope lights, and a large IKEA bag (which is the best for the beach!). This one is still a bit junky but it is organized and able to be opened.

And then I was left with this...


Oh joy- random little junk. After the last 2 hours- I am junked out! Time to go catch some Law and Order!

Wednesday, June 20, 2012

Plant Life

Sorry for the absence! The last two weeks have been quite busy- wrapping up school and gearing up for summer. I promise not to disappear for so long again!
After my latest forray into the world of terrariums, I ended up with a few extra plants that needed homes. So I scoped out a few new places for plants and plant containers. 

First, I zeroed in on my collection of vintage planters. I picked two to pot up, a green and yellow one. 


In both I choose to use one succulent and one non-succulent plant. I'm really kinda ashamed that I never thought to actually USE the planters as planters and not just decorative pieces. Duh! I'm totally loving them!

Next up, I grabbed a pot that I scored at a thrifting expedition a few weeks ago. I originally wanted to re-pot a small Christmas Cactus that I had propagated in it- but then it died. Boo! It all worked out okay because then this guy got a new plant AND a new spot on the living room mantle.

 
Here is a shot of my two new plants on the mantle...


I then potted up my new favorite little guy, which I affectionately named "dinosaur toe." I chose a small light yellowish green vintage pyrex dish. I potted up dinosaur toe and a hen and chicken, and lastly added a small plastic storm trooper ring that was a cupcake topper. It's kinda silly, but I like it! It's found a new home on the kitchen window sill.


Lastly, I added one of the terrariums I made in this post, to the scape of the newly moved furniture by the front door.

 I also took the opportunity to rework the set up of the table scape. I added a vintage clock, owl, and a stack of books.  To the right I added a vintage tray as a catch all for keys, sunglasses, etc.


I love the playful feel and punch of color when you enter through the front door. I will say I am a bit concerned about the amount the light the plants will receive here- so I'm going to keep an eye on them. I'll update ya'll soon on their progress!

Tuesday, June 5, 2012

Going green with vinegar and limes!

Post Memorial day cookout, we were left with lots of dishes and messy floors. Thank goodness for our new toy to tackle the dishes. However, when I pulled out the trusty Swiffer wet jet it literally broke in half! J and I actually tried to use it but failed as the pole kept coming apart, so off to the garbage it went. It had a long lovely life- in fact I can't even remember when I bought it! I planned to go out and grab a new Swiffer the next day until I saw a commercial for the Libman Freedom Mop. The next day I picked up a Freedom mop at my local Target store.


I brought it home and had planned on mixing up a Dr. Bronner's soap cocktail for a new less toxic floor cleaner. I am a huge Dr. Bronner's fan- peppermint and lavender are my favorites! I was all set to do it until I found some more simple green cleaners recipes on the internet and thought I'd give it a try.

Apartment Therapy's 25 Green Cleaners

50 uses for Vinegar

Homemade Cleaning Recipes

DIY Green Cleaning Products

I settled on an all purpose cleaning recipe that called for equal parts vinegar and H20. I mixed up two cups of each.


In my reading I found that many people suggested adding essential oils to help balance the oh-so-delicious smell of vinegar. Not having any essential oils on hand I added some lime zest, from about half a lime. I mixed it all up and added it to the mop reservoir.


Then I put the new mop and cleaner to the test on the kitchen floor, post cookout grimey-ness! All in all, the cleaning solution did a great job. I did have to put alittle elbow grease into it, but I think that was partly due to how dirty the floor was (don't judge!!!). I will admit the lime zest did not seem to have much effect on the smell but the scent did not linger AT ALL. I was pretty impressed. As an added bonus. the next day I discovered that my new cleaning solution was excellent at combating both cat urine and its smell. Oh the joys of having three cats! Once in awhile one of the little buggers has an accident, well at least I'm going to call it an accident. But the vinegar and water solution kicked the odor's butt!

The one downside I foresee here is only having one cleaning pad. I think that I'll have to purchase another one to have on hand in case of double or heavy duty cleanings, otherwise theres wait time for washing the pad. I'm also hoping that the pads hold up, but I guess time will tell. 

And of course, the best part of this whole switch up is cost. Cleaning solution, batteries, and disposable pads while not exhorbitantly priced, do add up. Vinegar, on the other hand, is SUPER cheap. You can pick it up a gallon at the grocery store for around two bucks! So here's to vinegar, limes, and a little H2O!!